Before the driveway pour, check the gate operator, the conduit routes, and both ends of every run on the same drawing. A sleeve under the driveway is only useful if it reaches the right equipment. And a conduit stub beside the gate post may still miss the operator’s permitted cable-entry area. Resolve those details while the trench and formwork are open.
Consider a commercial cantilever sliding gate with the operator on the left and a wired photo eye on the right. The electrician has brought power to the operator side. The concrete crew is ready to pour, but nobody has confirmed a route to the photo eye. The gate has a power supply on the drawing; the installation is still missing a connection. Catch it now, and the trades can coordinate the route. Catch it after the pour, and part of the finished driveway may have to come back up.
Set Out the Equipment Before You Draw the Conduit
Ask the gate supplier or installer to confirm three things: the operator base and its permitted conduit entry, the location of each wired device, and the finished surface levels. Overlay that information on the current civil drawing. Check it against the gate’s opening direction and runback, the anchor layout, reinforcement, drains, and curbs. A note that says “provide power at gate” gives the electrician no exact point to work to and gives the civil crew no way to spot a clash.
Use the current operator and mounting drawings rather than the location of a similar gate on another project. If the operator model, base, or handing changes, revisit the conduit setout before closing the trench. Our cantilever gate site preparation guide covers the relationship between the gate, its supports, and the foundations.
The electrical rough-in establishes routes, stub-up locations, and handover details. It does not mean the conductors have been pulled, terminated, energized, or tested. The operator base drawing, civil levels, and equipment schedule should all refer to the same approved revision.
Give Every Stub-Up Two Plan Dimensions and an Elevation
“Next to the post” is not a setout. Locate the stub-up in two directions from agreed fixed references, then state whether its elevation is measured from the existing surface, the top of the pad, or the finished grade. Show any paving buildup or change in curb height. The gate installer checks the stub against the operator pad and conduit entry; the civil crew checks for conflicts with anchors, reinforcement, and drainage.
Record who supplies the equipment, installs the conduit, pulls the cable, makes the connections, and commissions the system. For example, the gate supplier may provide the base drawing, the access-control contractor may identify the network endpoint, and the electrician may specify the cable route. Assign the actual work in the contract; supplying the gate does not, by itself, assign every field connection to the gate supplier.
Give Each Gate Conduit Run a Start and an End
This example shows a single operator on a cantilever sliding gate. Some devices sit on the opposite side of the driveway, and the layout includes an optional exit loop. The lines show routes to coordinate. They do not prescribe wiring connections, conduit quantities, or equipment mounting positions.
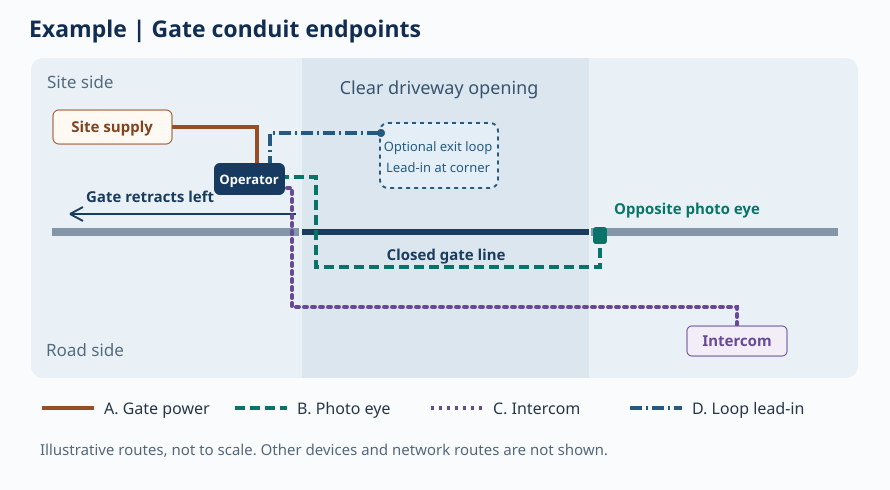
| Run | Endpoints to Record | Check Before Covering |
|---|---|---|
| A. Gate operator power | Site supply point → designated operator cable entry | Have the electrician verify the supply design against the selected operator and local requirements. Coordinate the stub-up with the pad, anchors, and finished grade. |
| B. Opposite-side photo eye | Gate control point → opposite-side sensor that needs wiring | Confirm the photo eye configuration and which side needs wiring. Mark the route under the driveway and both endpoints. Confirm the other protective devices separately. |
| C. Access control or intercom | Gate controller, power source, or network connection ↔ intercom pedestal | Identify the power, control, and communications endpoints separately. A network run may return to a building cabinet rather than the gate operator. |
| D. Optional vehicle loop lead-in | Vehicle loop exit point → enclosure containing the detector | Confirm the paving sequence, point where the lead-in leaves the pavement, and route back to the enclosure. See our gate loop detector guide for the role of vehicle detection. |
For a dual-operator gate, add a separate line for the primary-to-secondary operator connection. Verify supply, communication, and interlock requirements for the selected equipment. See our guide to remote gate access control when coordinating readers, intercoms, or other access devices. Do not count one spare sleeve as provision for every future power, control, and network run. Have the project electrician determine conduit size, burial depth, cable types, and separation based on the selected system, site, and applicable requirements.
Plan Differently for New Concrete, Existing Paving, or an Unselected Operator
| Site Condition | Decide First | Next Checkpoint |
|---|---|---|
| New driveway, before the pour | Coordinate underground and under-driveway conduit first, then set out the stubs against the approved equipment drawing. Verify both ends of each run. | Before covering or pouring, record the endpoint labels, elevation, actual route, and drawing revision. |
| Existing paving with old conduit | Find both ends and confirm that the existing run leads to the right point, can be pulled through, and suits the intended circuit. | If the run is blocked, untraceable, or ends in the wrong place, compare a route around the paving, another usable run, or a local cut assessed by the relevant trades. |
| The driveway is due before the operator is selected | Separate the crossing that can be coordinated now from the final equipment connection. Agree on an accessible transition point. | Once the operator is selected, match the final stub to the actual baseplate, permitted entry, anchors, and finished grade. |
Plan the Vehicle Loop Lead-In Even if the Loop Will Be Saw-Cut Later
A preformed vehicle loop may be installed as part of the paving work. A saw-cut loop can be installed later where the design and pavement allow it. Either way, show where the loop lead-in will leave the pavement and how it will reach the detector. Before planning a cut, have the relevant trades check the pavement, existing services, and reinstatement requirements. A future loop cut does not provide a conduit route to your photo eye or intercom.
Label Spare Sleeves and Keep Pull Points Accessible
Give each spare sleeve a label, two endpoints, and an intended use, such as a future intercom or a second access point. If the design calls for a pull string, pull box, or junction box, settle its location and who installs it before the trench is covered. A pull box provides access for drawing cable; a junction box houses connections where permitted. Verify the proposed use with the electrician, and keep the access point maintainable after paving.
Who Confirms the Layout, and Who Releases the Pour?
The gate supplier or installer provides equipment locations, the current pad or mounting drawing, and the list of devices that need wiring. The electrical and access-control trades identify the runs, label their ends, and confirm pulling and connection requirements. The general contractor or civil crew coordinates the proposed routes with foundations, rebar, drainage, and paving. The contract determines who signs off. What matters is that the people responsible check the actual setout against the same revision before the work is concealed.
If a stub lands in an anchor zone, one end of a crossing is missing, or a drain blocks the planned route, record it as open. Have the responsible trades revise the route and verify the new setout before releasing the affected area for concrete.
Field Example: The Conduit Crosses the Driveway but Ends at the Wrong Post
In this example, B-01 is for the opposite-side photo eye and C-01 is for the roadside intercom. At the pre-pour inspection, the crew finds B-01 at the intercom pedestal. Nothing reaches the photo eye. Counting two pipes would miss the problem. The handover record should say what was found, who will revise the route, who will verify the corrected endpoint, and when the affected area can be released.
Take at least one overview showing fixed reference points, such as a gate post and curb, and close-ups that show the run labels and stub direction. If the crew routed around a drain, mark the actual offset on the record drawing. A close-up of an unmarked pipe in an open trench will not help someone locate it after the concrete is in place.
Automatic Gate Pre-Pour Checklist
Use the checklist in the pre-pour walk-through. Record the project, entrance, drawing revision, and date. Keep unresolved items visible until the responsible trade has cleared them.
| Check | Suggested Reviewer | Record to Keep | Done |
|---|---|---|---|
| Operator location and entry | Gate supplier or installer + electrician | Current equipment drawing; stub-up position relative to the pad, anchors, and finished grade. | ☐ |
| Both ends and driveway crossings | Electrical / access-control trade + installer | Run ID, both endpoints, and the person who will confirm any equipment still pending. | ☐ |
| Civil conflicts resolved | General contractor / civil crew + electrician | Drainage, rebar, foundation, anchor, and paving conflicts resolved on the coordinated drawing. | ☐ |
| Conduit ready for handover | Electrical / access-control trade | Labels and protection at open ends; document route continuity and provision for pulling cable as specified. | ☐ |
| Circuit purpose and separation | Electrician / access-control trade + installer | Identify power, control, data, and loop lead-ins; record separation and spare-sleeve use for this project. | ☐ |
| Paving sequence and pending equipment | General contractor + installer | Loop installation stage, who confirms pending equipment, and any areas to leave open. | ☐ |
| Concealed-work record and release | General contractor + relevant trades | Pre-cover photos, surveyed offsets, drawing revision, unresolved items, and release record. | ☐ |
This checklist is for the rough-in handover. Terminations, energization, protective-device verification, and full gate commissioning are separate stages.
Frequently Asked Questions
Can I install conduit before the gate operator is selected?
You can coordinate the main route and crossing in advance. Keep the final equipment stub flexible until the gate team confirms the exact operator base and cable-entry area. Agree on an accessible point for the final connection.
Can one conduit serve the gate operator and the opposite-side photo eye?
Check what each route carries, where it terminates, and which separation rules apply. Equipment being close together does not make its circuits interchangeable. A single crossing also does not replace a branch to another device or a route back to the building.
Can the vehicle loop be added after the driveway is poured?
A saw-cut loop may be possible on suitable pavement; other loop products are installed with the paving. Either way, coordinate where the lead-in leaves the driveway and where it terminates before the pour.
If the stub is misplaced, can the operator base simply cover it?
Check the actual baseplate and the allowed cable entry. A stub can sit under the housing and still interfere with its anchors, enclosure, cable path, or service access. On finished concrete, have the relevant trades evaluate an accessible revised route before altering the base or structure.
Can wireless photo eyes or a Wi-Fi intercom remove every driveway crossing?
That depends on the equipment. Wireless communication does not tell you which devices still require wired power, grounding, or other connections. Verify each device and have the gate installer review any change to the protection layout before removing a route from the plan.
Why list a route from the intercom pedestal back to the building?
The pedestal can send an opening signal to the gate while relying on a separate building connection for power or data. Mark the power, network, and gate-control endpoints independently so each trade can see where its cable must go.
Does completing the conduit rough-in mean the gate electrical work is complete?
No. The rough-in handover confirms the routes, access points, and concealed-work records. Wiring and energization happen later. Travel limits, photo eyes, sensing edges, and the complete gate sequence are verified during commissioning according to the project requirements.